Lab 9 - Nutanix Kubernetes Engine - NKE

Nutanix Cloud Native is a collection of Nutanix Products that fit well in the cloud native space. Nutanix cloud native delivers reliable, automated, secure, and efficient services for developers on the private cloud and is powered by the leading hyperconverged platform, Nutanix Acropolis.
Bringing open source tooling and automation experience to the private cloud is more complex than simply deploying the same open source tools—it requires a high degree of expertise, labor, and automation. Using Nutanix cloud native, developers can take advantage of on-prem reliable tooling and automation required for the development and management of scale-out applications.
What product does Nutanix cloud native include?
- Nutanix NKE: Turnkey curated and enterprise-grade, NKE simplifies the provisioning, operations, and lifecycle management of Kubernetes.
- Nutanix Calm: Application Automation including Kubenetes workloads.
- Integrated Persistent Storage via Nutanix Volumes & Nutanix Files by leveraging the Nutanix.
- Nutanix Objects: Simple, secure, and scale-out Object storage for cloud native applications with Nutanix Objects™.
- Nutanix Era: DBaaS solution that automates and streamlines database management.
In this introductary lab, we will focus on Nutanix Kubernetes Engine where you will be provisioning NKE with with Nutanix Calm. You will experience the ease of deploying Kubernetes with persistent storage through Nutanix Container Services (CSI). Experience managing of K8s clusters with native kubectl tool, and how seamingless the adoption of Kubernetes technology can be with Nutanix. You will be able to deploy
Provisioning NKE
The objective for this blueprint is to provision both the NKE clusters and the kubectl client. The user can also download the latest kubeconfig. There are 3 available application profiles to deploy NKE clusters, and there are:
- Single Master
- ActivePassive Master
- Active Active Master
In Prism Central, Services > Calm > Blueprint.
noteThere is already a pre-seeded blueprint known as DeployNKE. Please duplicate the original blueprint and rename it as DeployNKE 01, 02, 03 etc as according to your assigned user. You should work on your blueprint for the rest of this lab.
Click on your own blueprint. e.g. Deploy NKE01, 02, 03 etc
Click onto Credentials
 In each of these credentials, fill out the following:
PE_Creds - Username: admin; Password: your_assigned_cluster_password
PC_Creds - Username: admin; Password: your_assigned_cluster_password
CENTOS - SSH Private Key
-----BEGIN OPENSSH PRIVATE KEY-----
b3BlbnNzaC1rZXktdjEAAAAABG5vbmUAAAAEbm9uZQAAAAAAAAABAAACFwAAAAdzc2gtcn
NhAAAAAwEAAQAAAgEAmZiLq0bQyzrEg1FrwU10v4ebflB43xpeMDKlGjuYO93c3w7YzQWT
vtLkzrsXhQLzhMeW2Lg3xevGPD0J76E/9SGv2Mq9DmW8M9PMeEUQz5ywoLxA1SG5XLNtzd
qAC4wckuNMc30GynHa6Q0sl7jtorcmXKlc2mljJpFdopwYFzrHt67XbiEV7kFpEyYeX248
hWzump/9pXywvFPaiPXANoasMP8V80tS3C1XXiLt1AaJtngcxobKVuLR9A8M/D1JjM3/z2
mfBkE1kzezK/u7D8a4/dIwvhFYo4mSD4SNzKDpCtOiL7VqZPNlJfZzY9dquDT+DD+drVmx
jFfK/Qb71Kqfxzyctr9C1EMtvTocA16viXbPJdMutOIHos4j3MYMbSKxG2G6lXBBwj0pJn
RP3ToT0EnYNgQZzp/f96nWbRC14fYwaIqy27MPksPiHS6kvtK/9wc715DjKqJ7HVPjlLSc
tWsI9q1jWCSSc9Ru1+AvicbkIUlE6yN5QZwrgI+MGnom4RdSf6PMppeuHVppUZKM3zd+kV
n6fFbrIgprG0iMEJN1Ztw8eyelaWXebkYvHMzgWvJ0ewccwHJI/RmQX9WfgRrGRomy5BNG
6NI2qO9moTGu1M2iQmc/R7y2pK5LJml5qs3lBNFq4VjOVtEbUFneDjMjLgjTMgwTKxwq1g
UAAAdA15KJUteSiVIAAAAHc3NoLXJzYQAAAgEAmZiLq0bQyzrEg1FrwU10v4ebflB43xpe
MDKlGjuYO93c3w7YzQWTvtLkzrsXhQLzhMeW2Lg3xevGPD0J76E/9SGv2Mq9DmW8M9PMeE
UQz5ywoLxA1SG5XLNtzdqAC4wckuNMc30GynHa6Q0sl7jtorcmXKlc2mljJpFdopwYFzrH
t67XbiEV7kFpEyYeX248hWzump/9pXywvFPaiPXANoasMP8V80tS3C1XXiLt1AaJtngcxo
bKVuLR9A8M/D1JjM3/z2mfBkE1kzezK/u7D8a4/dIwvhFYo4mSD4SNzKDpCtOiL7VqZPNl
JfZzY9dquDT+DD+drVmxjFfK/Qb71Kqfxzyctr9C1EMtvTocA16viXbPJdMutOIHos4j3M
YMbSKxG2G6lXBBwj0pJnRP3ToT0EnYNgQZzp/f96nWbRC14fYwaIqy27MPksPiHS6kvtK/
9wc715DjKqJ7HVPjlLSctWsI9q1jWCSSc9Ru1+AvicbkIUlE6yN5QZwrgI+MGnom4RdSf6
PMppeuHVppUZKM3zd+kVn6fFbrIgprG0iMEJN1Ztw8eyelaWXebkYvHMzgWvJ0ewccwHJI
/RmQX9WfgRrGRomy5BNG6NI2qO9moTGu1M2iQmc/R7y2pK5LJml5qs3lBNFq4VjOVtEbUF
neDjMjLgjTMgwTKxwq1gUAAAADAQABAAACADazaSp6cemu6EWMPb/+AdIkTXBS4Hk0Ps8T
elE5YCISBZM7CmMZ1WBkYzBs2Rd50Zg8LLDKCrLmIRda9art1oVKlgGzUllKShh7GZrLng
0SVKUp5j0BYa5uCHEDnA6Au7xkTtnicQSwP7I4CuWN6rPEXlkpx/PRDIqzwpEi3kGHoZD9
J6QFDHZpvS4gqTh7Xfp2rRNMX10MZzTq+C1GuEmy9KgOcJbRAJWBYFgaQHD+UxU0+aqKXo
1LAlLU+V7rxMHsq2oGx6fGmXnwoFLNt/UKZN+gd9N5AgRb/jSglI+HzvcYH+61wUpqlF9M
whOQqGUqGj/qeBFAnEbLDXPHhO/O9IABg7mIXlbwpQF7rNYPv0iE1tgKk34UHWqioE1OsY
1C/aDd86GNeG2GNy3FQJWweOZTY20FInMQ/8dMflVXU0r8gorYHx0ppV6mTHstcgGvVwCb
fcxo+gBVWne/EJNwxXtOJV4mcnnyx1aPEFkk7mGQHd5t+ZtseXWdT9tBqOPZmTMycp5Izs
zWS30AOhD1ENnSCHfK6/Zw1WHc6h/pzwBgGYOkFpRiY5yAzg9s2n/D03RL/U2YqZbDdSvT
HcGjZQvJ49SIt5NPuYNy9t393TrqZbXFpwKAnmFrkHTzixp7/atHCc1fkOffMdfTPYQm4b
FSFqxcmC2jXoHnGiKRAAABACMql2RBRTTsQ4D8Mafs1+Ulcr6zchAHz0pujsq9h6O0YqEk
yFygNPA0wJXru0CPkDzOj6T/YSYqWsCdmzhiis0sojI04XS9xqEwFqC88AcJ3v5aU7ZmOX
bJLiJFeMk3Fbx7ORouTqE+gzgtruVzb6oM2rTn5Amr6IEWVZhcPKKlp3gl1A4q2VHNDzbI
hdg13pBsqfFbn5O8Hnqo58fkDJ6eVJ4Ea/MNeWTvpPCsgQngSVfHFqI07azWpbeIix/EVF
vwFmjnTglviHVpkTTLnjXr4lxgqjkl9slpgccLuKAuaKXwBkeHMCH1H9pa8aONxCpGOINc
Mplpv3p+TXMqAX4AAAEBAMysTl4MGiarGiuKrx7LRY7m0kHoyThxleAjoA1CbAY2jkOtgu
MVRLjEn2TWNZir7eJDoA1hH+lOlzMtxt46vAoclOyrIK1WwfxdY71eoqfZx+PiUsa+LXQ/
3hzKfwpTh66di4N3RPr1k75V0nNpPiIuFKV0d1a8wOWDlfcgWhix71EfIgn8cHXWnU/boU
63VD3dMS6g+sT6fHin+mPVh2x86q2fJRRIVSb/xzBYLmHmfG/2WSli5DAbfuFk/+PfnBOX
AoUDTbcO5NUlsN/zlZQxfEJNV+Ve1VRmso2Q/coVm6mMtxGUuRiZqygiY6FXOu7HApHsIG
LlrsDZZYE/zBMAAAEBAMAdKb5z4p3b3psgHTxIV7Zd4ayuPQAMCrLK+Q6XeJHebSVa3Go9
QOkLNV/XLL15QghJYRuVv8zLCe8kyLmlaUZiK71XC6Q3JSf+H/sHQei0bF3muVPbP0APm4
BDRjeSN5DNJb2edT3lDdRM78EHQ/TDvpc97XhNAjT0ueq97V5ej7C37qiKIPRX/K1MG9W9
0oUlcplFX0O/4sWFERMgbVb1uLUSt5AfZvfUG4OL81hOoVi1+Ndlzu6eG+lLtpIdKsJxRc
fpr3X6sKxq+nmKn02/P50zEXgG95XXdqvFK0z6SnxFfwZyjmToHqEOUwmgHURq4oXh0yEe
JMvFwdu36IcAAAAGY2VudG9zAQIDBAU=
-----END OPENSSH PRIVATE KEY-----
Copy and paste it into SSH Private Key.
Centos 2 Credential : username: centos; password: nutanix/4u
PE_SC_Creds : - Username: admin; Password: your_assigned_cluster_password
CalmVM_Cred : see PC_Creds
Click Save and Back.
Karbon - Service Name
Under VM section, please fill out the missing information:
- Cluster: your_assigned_cluster_password
- VM Configuration:
- VM Name: _your_initial_NKE@@{calm_array_index}@@
- Disks
- Image: GenericCentos7
- Network Adaptors (NICs)
- Primary
- Check log-in upon create - check the tick box
- Credential: CENTOS
Click Save
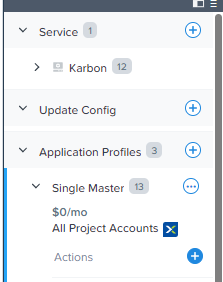
Single Master Configuration
Click on Application Profiles > Single Master.
On the Variables field on the right, scroll to the bottom of the list and changes these variables according to you assigned environment.

- CalmVM_IP: Please use the same IP address of your Prism Central
- PC_IP: IP Address of Prism Central
- PE_IP: IP Address of Prism Element
- No_Worker_Node: key in the number of nodes. Default is 1.
- Repeat the above steps for Profiles:
- Active-Passive Master
- Active-Active Profile
Click Save
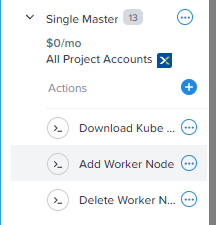
Single Master Configuration - "Add Worker Node" Action Variable
Click on Application Profiles > Single Master > Add Worker Node
On the right side of the window, under Variables > node_pool_name, expand the setting.
Scroll down to the Script session and amend the pc_pass based on your own assigned cluster.
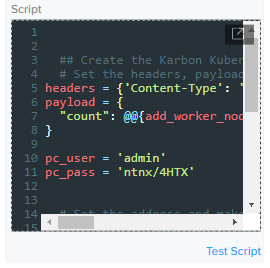 note
noteUnder normal circumstances, you should not be performing these steps but unfortunately at the time of writing, there is found to be a bug which affects the dunamic variable in scripts. This will be resolved in the next release of Calm.
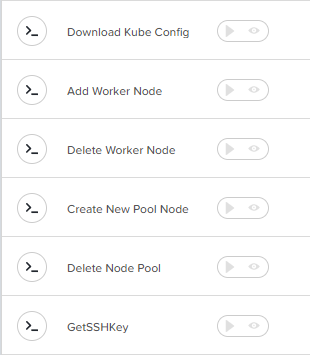
Repeat step 1 to 3 for "Delete Worker Node".
Repeat step 1 to 3 for "Delete Node Pool".
Click on Single Master > Application Profiles. Make the same changes under:
Storage Container dynamic variable
network_name dynamic variable
image_name dynamic variable

Click Save, to update the latest changes in the blueprint.
Repeat steps 1-7 for Active Passive Master and Active Active Master
Launching the Blueprint
Before you launch the blueprint, please ensure that the blueprint is free of errors, indicated by a red exclaimation mark. You can safely ignore any warnings if any...
Create Single Master Node with Flannel CNI
Click on Launch and fill out the fields below:
- Application Name: you_inital-SM_Flannel
- Profile: Single Master
- Please key in the Kubernetes CLuster Name: _your_inital-mo-flannel
- Please select the Kubernetes version: 1.24.7.0
- Please select the Kubernetes Node Network: Flannel
- Please select the Storage Container in the Cluster: Default
- Please select the network: Primary
- Please select the Image Name: ntnx-1.4
- Select the File System for the Storage Class: ext4
- Number of Worker Node: 3
- Worker Node Disk Size (Gb): 120
- Worker Node Memory (Gb): 8
- Please key in the Worker Node CPU: 4
- calico_cidr: leave as default.
Click Deploy. The blueprint will take around 10 mins to complete.

Congratulations on another successfully deployment!
Setting Up Kubectl tool
In-order to access and manage a Kubernetes cluster, as a best practice, you should never access the master node (control pane) directly. Instead, you should setup a DevStation - see Appendix or in this setup, access your Kubernetes cluster with kubectl tools installed in this Karbon node.
Click on Services tab, click on the Karbon machine. You should see a banner on the right.

- Click Open Terminal
- click Proceed to accept the default CENTOS credential.
A new web terminal will open, execute the following on the terminal window:
- type: sudo passwd
- change the password to "nutanix/4u".
- this will initialize root and all it's authentication token.
Type the following in the Terminal.
Type: ls -l
noteThere should be a kubectl configuration file.

Type: KUBECONFIG=/home/centos/<your_cfg>.cfg
Type: export KUBECONFIG
The steps above will get your kubectl tool to find and access your Kubernetes cluster.
To verify that it is setup successfully, you should get kubtctl to return the results as below:
Type kubectl get nodes

Take note of the number of nodes you have created as above.
Creating a Single Master Node with Calico CNI
Click on Launch and fill out the fields below:
- Application Name: you_inital-SM_Calico
- Profile: Single Master
- Please key in the Kubernetes CLuster Name: your_inital-mo-calico
- Please select the Kubernetes version: 1.24.7.0
- Please select the Kubernetes Node Network: Calico
- Please select the Storage Container in the Cluster: Default
- Please select the network: Primary
- Please select the Image Name: ntnx-1.4
- Select the File System for the Storage Class: ext4
- Number of Worker Node: 3
- Worker Node Disk Size (Gb): 120
- Worker Node Memory (Gb): 8
- Please key in the Worker Node CPU: 4
- calico_cidr: leave as default.
Click Deploy. The blueprint will take around 10 mins to complete.
Congratulations! You have successfully deployed your 2nd Kubernetes Cluster!
You can continue to launch more Kubernetes clusters with the blueprint with both Active-Passive and Active Active Kubernetes clusters setup. This is entirely option.
Creating New Node Pool
Kubernetes runs your workload by placing containers into Pods to run on Nodes. Let's see how easy it is to scale your node pool.
You can use any of your recently deployed Kubernetes Cluster to complete the below steps.
In Calm > Applications > Manage
Click on the play button beside - Create New Pool Node
Fill out the following fields:
- Please key in the new Node Pool Name: worker-node-pool2
- Please key in the number of nodes in the Node Pool:
- Please key in the number of vCPU for the node pool:
- Please key in the node memory in Mib:
- Please key in the hard disk per node: 122880
The default value is 120 GB per node
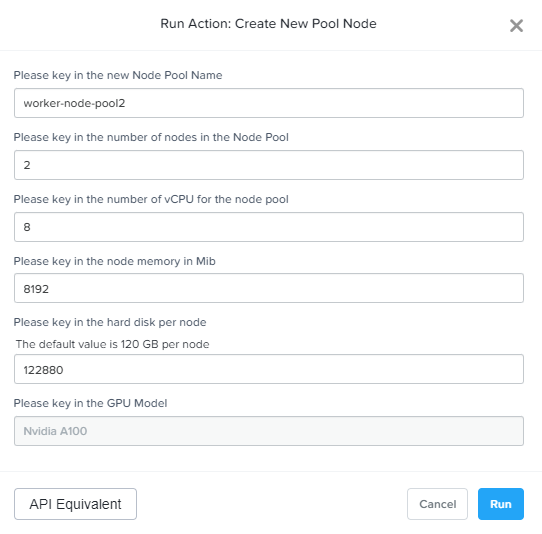
Click Run to deploy new worker pool node.
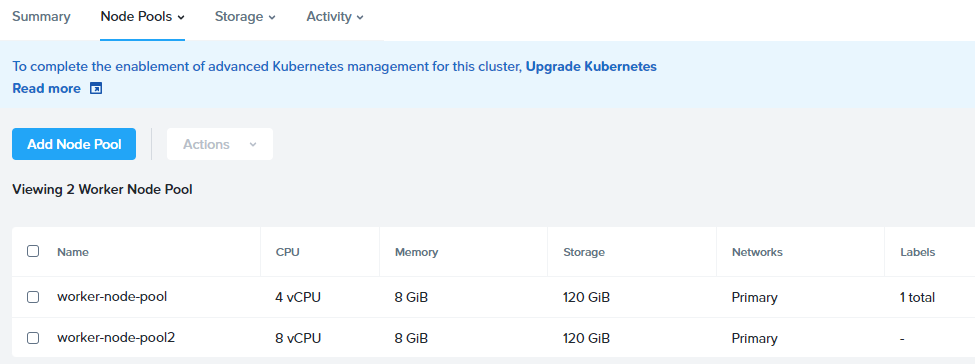
Click on Audit.
Expand Create New Pool Node, to check the deployment status.

Go to Services > Kubernetes > Node Pools > Worker
You should now see a newly created node pool.
Add Worker Nodes into Node Pool
Now that your worker pool has been created, it is time to add in new work nodes.
In Prism Central, Calm > Application > Manage.
Click Add Worker Node.

Select the node pool to add the worker node(s).
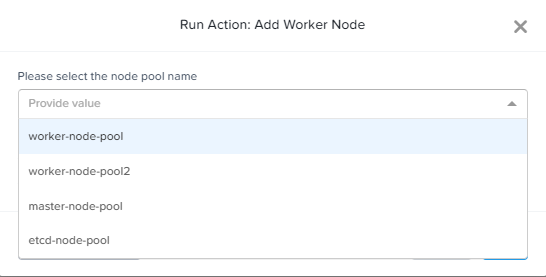
Add the number of worker nodes to be added into the pool. then click Run.

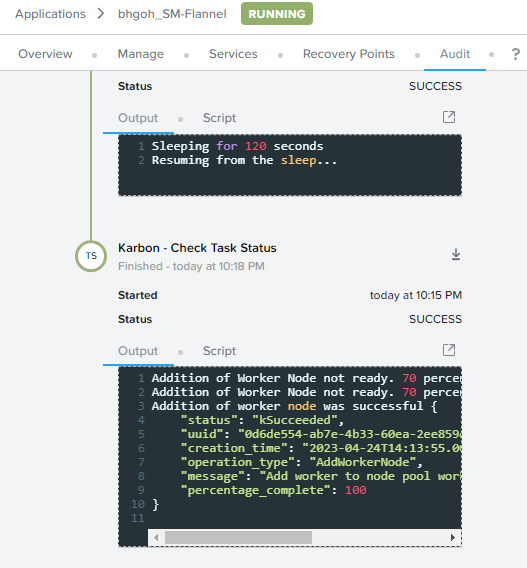
Click on Audit, expand the action task and observe for the completion of the task.
Go to Services > Kubernetes > <your_cluster>
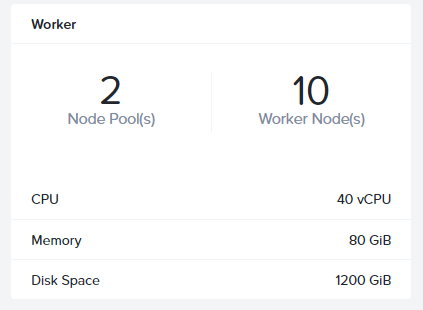
See under Worker and notice that the number of worker nodes has increases...
Remove Worker Nodes from Node Pool
Now we shall see how we can scale down the resources required in the Kubernetes Cluster.
Back to your Application > Manage. Click on Delete Worker Node
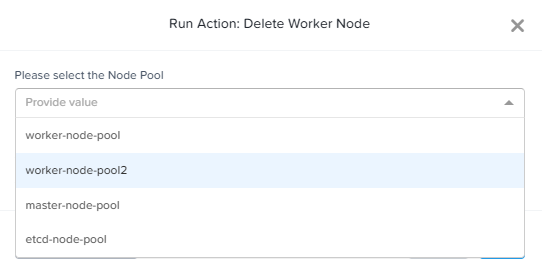
Select the same worker node pool which you deployed earlier.
Select the number of worker node to delete. Then click Run.

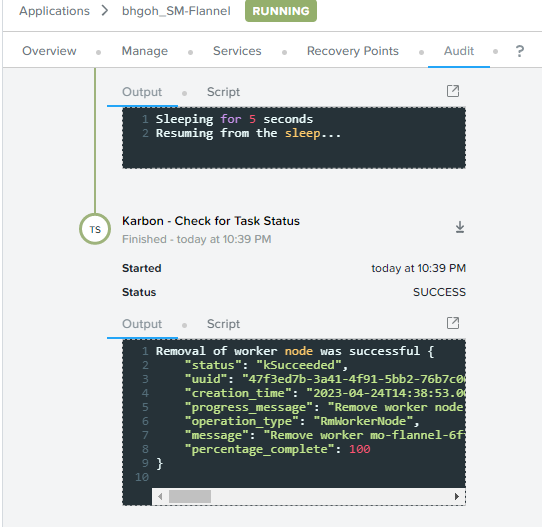
Click on Audit, expand the task, and observe until the task is completed.
The worker nodes have been successfully removed.
You can go back to Service > Kubernetes > Summary > Worker to observe the decrease in the worker nodes.

Remove Worker Node Pool
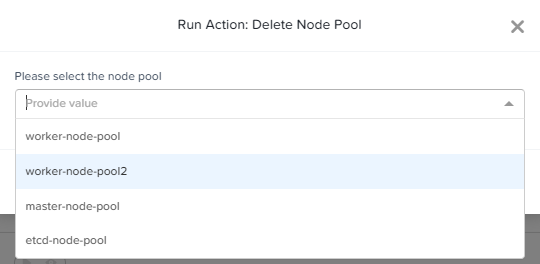
Back to your Application > Manage. Click on Delete Node Pool

Select the node pool which you wish to delete.
Click on Run to execute the task.

Click on Audit, expand the task, and observe until the task is completed.
Congratulations!!
Key Takeaway
In order to successfully deploy a Kubernetes on a baremental server, it is a very tedious and complex task to take on. As Kubernetes is a system that requires multiple different technologies put together with each piece of its component in the right working order to complete a Kubernets management system.
With Calm as the main orchestrator of multi-clouds, deploying and managing Kubernetes becomes a fairly simple and straightforward task. With Nutanix Open APIs, Nutanix HCI and Calm pulls together to create these advantage:
- single one click deployment of Kubernetes Clusters with NKE.
- provides seamingless Nutanix Container Services(CSI) integration to provide persisten storage to containers.
- Run day 2 actions such as adding, deleting worker nodes, adding and deleting worker node pool.
All these actions help to provide an abstraction between the developers and the infrastrucutre team such that each can focus on their designated task to excute them without any distractions.