Lab 1 - Create Project
Create Project
Sally has recently joined Fantasy Financial Company as their IT Dev/Ops engineer. The company has invested and standardise Nutanix HCI as their Hybrid Cloud of choice. During the course of her work, she found that there has been a high volume of support tickets logged around application stability. She further finds out that the main cause on the stability was the fact that the applications created on these machines were based on many different configurations such as:
- different memory profiles
- different core:p.core ratio
- different software dependencies
This has resulted in inconsistent behaviour on their applications, leading to many support calls. Determined to fix the issues, she decides to automate the provisioning of vms in the environment to provide a consistent delivery of these applications.
Create a Project in Calm
A project in Calm defines a group or users to manage common set of requirements or functions. For example, an administrator can define resources such as existing networks, VMs resources into an Marketing Project, associate its members to it and set usage limits on the infrastructure resources.
- Let's start by first creating a project. In the Calm interface, click on the bottom left toolbar.

- Next, click on +Create Project button

- Fill in the Project Name. Please fill in your your-initials-project. e.g bhgoh-project

Adding Users/Groups & Resources
- In the Summary box, at the first box - Users, Groups and Roles, click + Add User.
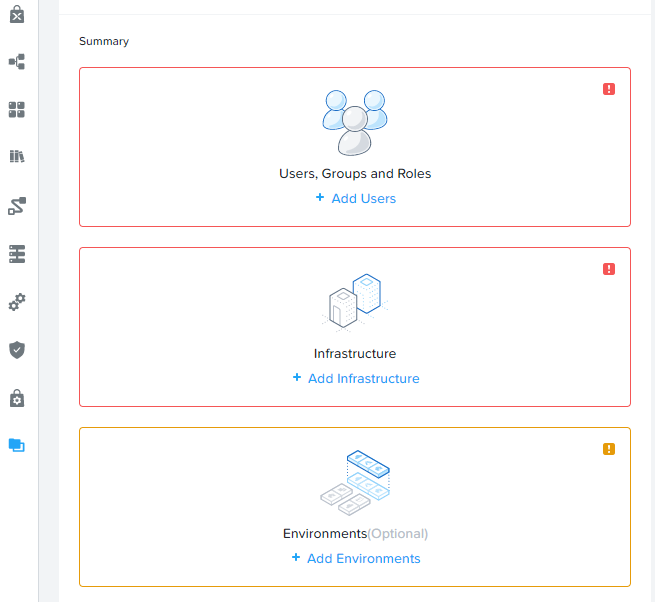
- Click Add/Edit Users & Groups to proceed to the next step.

Click + Add User.
In the following window, please fill in an adminuser and a consumer user as define in the screenshot below. These are pre-configured AD users that has been define based on your cluster number. Do note that you are to add in the users xx, where xx is your assigned cluster number.

- Click on the infrastructure tab.

- Click on Add Infrastructure button and select the default account given.

- Click on Configure Resources

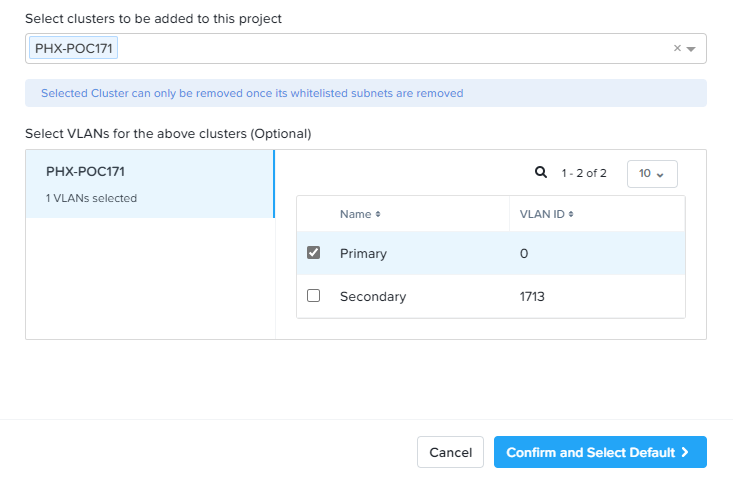
- Next, select the cluster and select + Select VLANs to proceed.

- Choose Primary tick the checkbox beside it. Click Confirmed and Select Default to complete the configuration.
VM configuration
To enable application blueprints to be publish in the Marketplace, you will need to define the base VM configuration. To do so please follow the steps below:
Go back to Projects if you have exited out of the window and click on the project name which you have just created.
Click + Add Environments and click Create Environment.

- Enter the name of your assigned cluster and your initials as below.

Select the drop down menu and choose the pre-define Accounts. It should be NTNX_LOCAL_AZ Then click next to proceed.
Expand the option with the blue drop down menu as below:
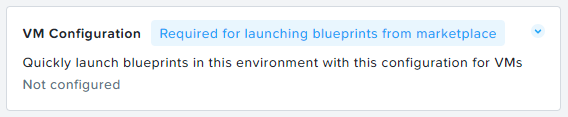
In the VM configuration box, you will need to define the base configuration of both Windows and Linux. Please fill in the information below:
Windows
a. In the cluster option, open the menu and select your cluster.
b. For the vm resources:
vCPUs = 2
Cores per vCPU = 2
Memory GiB = 4
You will notice at the far right corner of the bar, there is a running man inconsistent
. This denotes as a run-time variable which allows a user
to dynamically define the vm resources at the launch of the blueprint.
c. In the Disk1 section, under Image select Windows2019.qcow2 image.
d. Scroll down to Network Adaptors NICs. Click the + icon
 .
You will see NIC 1 section. Select Primary.
.
You will see NIC 1 section. Select Primary.e. Click + Add Credential and fill in the options:
- Name: Win_admin
- Username: administrator
- Password: nutanix/4u
Next, scroll back up and click Linux and repeat with the following options.
Linux
a. In the cluster option, open the menu and select your cluster.
b. For the vm resources:
vCPUs = 2
Cores per vCPU = 2
Memory GiB = 4
You will notice at the far right corner of the bar, there is a running man inconsistent
. This denotes as a run-time variable which allows a user
to dynamically define the vm resources at the launch of the blueprint.
c. In the Disk1 section, under Image select CentOS7.qcow2 image.
d. Scroll down to Network Adaptors NICs. Click the + icon
.
You will see NIC 1 section. Select Primary.e. - Name: CentOS7
- Username: root
- Password: nutanix/4u
Click next and Save Environment.
You should notice that the environment is ready for:
- Blueprint Creation
- Marketplace Usage
Great job!! You have now a working Project which are ready for Marketplace publishing.
Key Takeaways
With projects and it's variables defined, Sally can now create blueprints that are accessible by the team, standardise the resources and dependencies require so that it minimises human errors and stablises the platform for further applications. In addition, there is a Nutanix Marketplace feature where Sally through a group of project related users can published their applications for consumers to access their applications through a one click mechanism.
We will look at publishing those applications right after creating them.