Lab 3 - Create A Multi-VM BP
Create a Multi-VM Blueprint
Sally can now create blueprints deploying single VM app on them. With blueprints deployment, Sally can ensure that the apps will be deployed in a consistent and predictable manner. In addition, the one-click deployment mechanism minimises human errors and Projects ensures only a selected group of directory users get acccess to the apps. However, the job is not done yet, Sally will expand her use cases to include multi-vm blueprints that will serve the larger community. In the process, "merging" of both infrastructure and developers' team to create and deploy blueprints.
Creating a Multi-VM Blueprint
In this lab we are creating a multi vm blueprint to deploy a Linux-base 3-tier application.
- Includes deployments of Linux, Nginx, MySql and PHP (standard LEMP stack)
- Includes deployment of HAProxy for cluster management
- Deployment of the blueprint to demonstrate the one-click nature of Calm applications.
A blueprint is the framework for every application that you model by using Nutanix Calm. Blueprints are templates that describe all the steps that are required to provision, configure, and execute tasks on the services and applications that are created. You can create a blueprint to represent the architecture of your application and then run the blueprint repeatedly to create an instance, provision, and launch your applications. A blueprint also defines the lifecycle of an application and its underlying infrastructure starting from the creation of the application to the actions that are carried out on a blueprint until the termination of the application.
In Prism Central, select > Services > Calm

Select Blueprints in the left hand toolbar.

Click + Create Blueprint > Multi VM/Pod Blueprint.
When going through this lab, many sections will indicate the name of a service/VM, the description of an object/entity (etc). It is recommended that you copy and paste the values shown in the lab guide, making sure to replace your_initial as appropriate. This will help ensure the expected outcome is achieved.
- Fill in the following fields:
Name: your_initials-CalmLEMP
Description: Introductory Linux blueprint
Project: your_initials
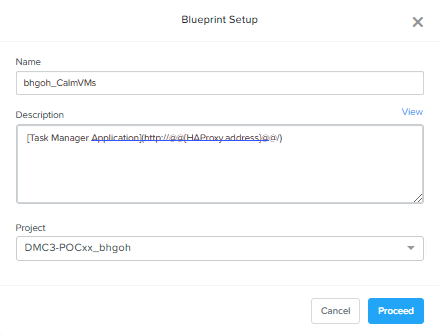
What you see in the decription [Task Manager Application] (http://@@{HAProxy.address}@@/) is the use of Calm Macros. @@{HAProxy.address}@@ is a placeholder where Calm will substitute the ip address of HAProxy server when the application is being launched. Calm has many built-in macros, the complete list of which can be found in the Calm Macros
- Click Proceed to move to the next step.
Creating Credentials
Credentials will be used to authenticate to the CentOS VMs you will eventually deploy. Credentials are unique to each blueprint, each blueprint requires a minimum of one credential.
This lab will utilise a CentOS image known as "Generic Cloud" CentOS image. This is a common CentOS distributions and is lightweight, supports Cloud-Init base configuration and utilizes SSH keypair authentication instead of passwords. Public/private key pair based authentication is commonplace in many public cloud environment.
In the menu bar at the top, click Credentials.

Click Credentials + and fill out the following fields:
Credential Name: CentOS
Username: centos
Secret Type: SSH Private key
Key: Paste in the your own private key or the key below.
-----BEGIN RSA PRIVATE KEY-----
MIIEowIBAAKCAQEAii7qFDhVadLx5lULAG/ooCUTA/ATSmXbArs+GdHxbUWd/bNG
ZCXnaQ2L1mSVVGDxfTbSaTJ3En3tVlMtD2RjZPdhqWESCaoj2kXLYSiNDS9qz3SK
6h822je/f9O9CzCTrw2XGhnDVwmNraUvO5wmQObCDthTXc72PcBOd6oa4ENsnuY9
HtiETg29TZXgCYPFXipLBHSZYkBmGgccAeY9dq5ywiywBJLuoSovXkkRJk3cd7Gy
hCRIwYzqfdgSmiAMYgJLrz/UuLxatPqXts2D8v1xqR9EPNZNzgd4QHK4of1lqsNR
uz2SxkwqLcXSw0mGcAL8mIwVpzhPzwmENC5OrwIBJQKCAQB++q2WCkCmbtByyrAp
6ktiukjTL6MGGGhjX/PgYA5IvINX1SvtU0NZnb7FAntiSz7GFrODQyFPQ0jL3bq0
MrwzRDA6x+cPzMb/7RvBEIGdadfFjbAVaMqfAsul5SpBokKFLxU6lDb2CMdhS67c
1K2Hv0qKLpHL0vAdEZQ2nFAMWETvVMzl0o1dQmyGzA0GTY8VYdCRsUbwNgvFMvBj
8T/svzjpASDifa7IXlGaLrXfCH584zt7y+qjJ05O1G0NFslQ9n2wi7F93N8rHxgl
JDE4OhfyaDyLL1UdBlBpjYPSUbX7D5NExLggWEVFEwx4JRaK6+aDdFDKbSBIidHf
h45NAoGBANjANRKLBtcxmW4foK5ILTuFkOaowqj+2AIgT1ezCVpErHDFg0bkuvDk
QVdsAJRX5//luSO30dI0OWWGjgmIUXD7iej0sjAPJjRAv8ai+MYyaLfkdqv1Oj5c
oDC3KjmSdXTuWSYNvarsW+Uf2v7zlZlWesTnpV6gkZH3tX86iuiZAoGBAKM0mKX0
EjFkJH65Ym7gIED2CUyuFqq4WsCUD2RakpYZyIBKZGr8MRni3I4z6Hqm+rxVW6Dj
uFGQe5GhgPvO23UG1Y6nm0VkYgZq81TraZc/oMzignSC95w7OsLaLn6qp32Fje1M
Ez2Yn0T3dDcu1twY8OoDuvWx5LFMJ3NoRJaHAoGBAJ4rZP+xj17DVElxBo0EPK7k
7TKygDYhwDjnJSRSN0HfFg0agmQqXucjGuzEbyAkeN1Um9vLU+xrTHqEyIN/Jqxk
hztKxzfTtBhK7M84p7M5iq+0jfMau8ykdOVHZAB/odHeXLrnbrr/gVQsAKw1NdDC
kPCNXP/c9JrzB+c4juEVAoGBAJGPxmp/vTL4c5OebIxnCAKWP6VBUnyWliFhdYME
rECvNkjoZ2ZWjKhijVw8Il+OAjlFNgwJXzP9Z0qJIAMuHa2QeUfhmFKlo4ku9LOF
2rdUbNJpKD5m+IRsLX1az4W6zLwPVRHp56WjzFJEfGiRjzMBfOxkMSBSjbLjDm3Z
iUf7AoGBALjvtjapDwlEa5/CFvzOVGFq4L/OJTBEBGx/SA4HUc3TFTtlY2hvTDPZ
dQr/JBzLBUjCOBVuUuH3uW7hGhW+DnlzrfbfJATaRR8Ht6VU651T+Gbrr8EqNpCP
gmznERCNf9Kaxl/hlyV5dZBe/2LIK+/jLGNu9EJLoraaCBFshJKF
-----END RSA PRIVATE KEY-----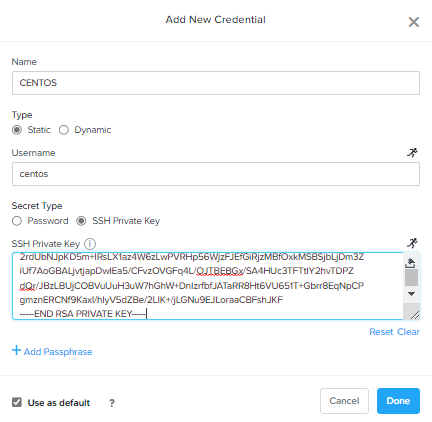
- Click Done and click Back
Defining Variables
Variables allow extensibility of Blueprints, meaning a single Blueprint can be used for multiple purposes and environments depending on the configuration of its variables. Variables can either be static values saved as part of the Blueprint or they can be specified at Runtime (when the Blueprint is launched). Variables are specific to a given Application Profile, which is the platform on which the blueprint will be deployed. For example, a blueprint capable of being deployed to both AHV and AWS would have 2 Application Profiles. Each profile could have individual variables and VM configurations.
By default, variables are stored in plain text and are visible in the Configuration Pane. Setting a variable as Secret will mask the value and is ideal for variables such as passwords.
Variables can be used in scripts executed against objects using the @@{variable_name}@@ construct. Calm will expand and replace the variable with the appropriate value before sending to the VM.
- In the Configuration Pane on the right side of the Blueprint Editor, under variables, add the following variables.
Variable names are CASE SENSITIVE!
  Variable Name           Value                 Secret         Runtime
-----------------------------------------------------------------------
  User_initials           xyz                                      X
  Mysql_user              root
  Mysql_password          nutanix/4u                X
  Database_name           homestead
  INSTANCE_PUBLIC_KEY     Use the provided
                          key below.
ssh-rsa AAAAB3NzaC1yc2EAAAABJQAAAQEAii7qFDhVadLx5lULAG/ooCUTA/ATSmXbArs+GdHxbUWd/bNGZCXnaQ2L1mSVVGDxfTbSaTJ3En3tVlMtD2RjZPdhqWESCaoj2kXLYSiNDS9qz3SK6h822je/f9O9CzCTrw2XGhnDVwmNraUvO5wmQObCDthTXc72PcBOd6oa4ENsnuY9HtiETg29TZXgCYPFXipLBHSZYkBmGgccAeY9dq5ywiywBJLuoSovXkkRJk3cd7GyhCRIwYzqfdgSmiAMYgJLrz/UuLxatPqXts2D8v1xqR9EPNZNzgd4QHK4of1lqsNRuz2SxkwqLcXSw0mGcAL8mIwVpzhPzwmENC5Orw== rsa-key-20190108
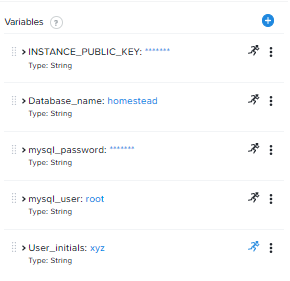
- Click Save.
Adding a Downloadable Image
There are two ways you can deploy images for use as part of your Blueprint. One method describe below allows you to seed in the disk image with a URL directly on the Blueprint. Another method is to seed them into Prism Central Image Services and then make it as a selectable in the image option in your blurprint. Both method works! You only need to do one of the following exercise.
Click Configuration > Downloadable Image Configuration and fill in the following fields:
Package Name: Generic_Centos7_Cloud
Description: CentOS 7 Cloud Image
Image Name: GenericCentOS7
Image Type: Disk Image
Architecture: x86_64
Source URI: http://download.nutanix.com/calm/CentOS-7-x86_64-GenericCloud.qcow2
Product Name: CentOS
Product Version: 7
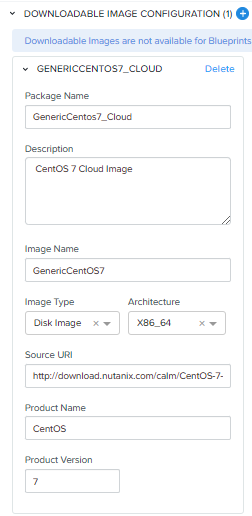
Click Save and then Back
Adding the Source Image (optional)
The source for the VM deployment are based on a disk images. With Calm, you can select a downloadable image via a URL or pre-seeded into Prism Central. In this exercise, you will be seeding the image into Prism Central instead.
Go Compute & Storage > Images.

Click Add Images
Select URL from Image Source
Fill in the URL below:
http://download.nutanix.com/calm/CentOS-7-x86_64-GenericCloud.qcow2
- Click Upload file button and fill out the details below:
- Name: GenericCentOS7
- Type: disk
- Description: CentOS 7 Cloud Image
Leave the Checksum field blank and click Next to proceed.
Under Placement Method. Leave the default as Place image directly on clusters. Ensure your cluster is selected and click Save.
Go to Activity > Tasks and observe the completion of the task.

With the image now seeded into Prism Central. You can reuse this image over and over again including multiple projects.
Now head back to Services > Calm > Blueprint and into your Blueprint Editor.
Creating Services
Services are virtual machine instances or existing machines that upi can provision and configure by using Calm.
In the following exercises you will create the database, webserver and the load balancer services that comprise your application.
Creating the Database Service
In the Application Overview > Services, click to add a new service. By default, the Application Overview is located in the lower right-hand corner of the Blueprint Editor and is used to create and manage Blueprint layers such as Services, Application Profiles and Actions.

Note - Service1 that appears in the Workspace and the Configuration Pane reflects the configuration of the selected Service.
Fill in the following fields:
- Service Name: MySQL
- Name: MySQLAHV
infoThis defines the name of the substrate within Calm. Names can only contain alphanumeric characters, spaces, and underscores.
- Account: NTNX_LOCAL_AZ
- Operating System: Linux
- Cluster: your_cluster
- VM Name: @@{User_initials}@@-MYSQL-@@{calm_array_index}@@-@@{calm_time}@@
noteThis will use the Runtime User_initals variable you previously provided to prepend the VM name with your initials. It will also use built-in macros to provide the array index (for scale services) and a time stamp.
vCPUs: 2
Cores per vCPU: 1
Memory: 4
Select Guest Customization:
- Type: Cloud-init
- Script:
#cloud-config
users:
  - name: centos
    ssh-authorized-keys:
      - @@{INSTANCE_PUBLIC_KEY}@@
sudo: ['ALL=(ALL) NOPASSWD:ALL']noteThis will leverage Cloud-Init to populate the SSH public key variable as an authorized key, meaning the corresponding private key can be used to authenticate to the host.
- Disks(1):
- Image: GenericCentOS7
- NETWORK ADAPTERS (NICs)(1):
- NIC1: Primary
- Credential: CENTOS
Click Save.
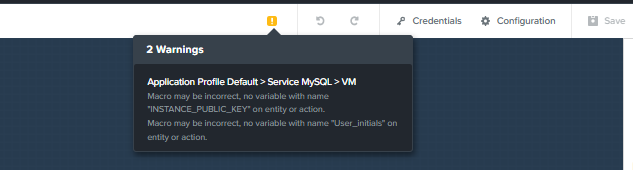
noteIf errors or warnings are presented after saving the blueprint, hover over the icon in the top toolbar to see a list of issues. Resolve any issues and Save the blueprint again.
Now that you have completed the deployment details for the VM associated with the service, the next step is to tell Calm how the application will be installed on the VM.
With the MySQL service icon selected in the Workspace pane, scroll to the top of the Configuration Panel, and select the Package tab.
The Package is the configuration and application(s) installed on the Service, and is typically accomplished by executing a script on the Service VM.
Specify MySQL_PACKAGE as the Package Name and click Configure install.

Note the Package install field that appears on the MySQL service in the Workspace pane.
Select +Task and fill out the following fields in the Configuration Panel to define the script that Calm will remotely execute on the MySQL Service VM:
- Task Name: Install_sql
- Type: execute
- Script Type: Shell
- Credentials: CENTOS
- Script:
#!/bin/bash
set -ex

sudo yum install -y "http://repo.mysql.com/mysql-community-release-el7-5.noarch.rpm"
sudo yum update -y
sudo setenforce 0
sudo sed -i 's/enforcing/disabled/g' /etc/selinux/config /etc/selinux/config
sudo systemctl stop firewalld || true
sudo systemctl disable firewalld || true
sudo yum install -y mysql-community-server.x86_64

sudo /bin/systemctl start mysqld
sudo /bin/systemctl enable mysqld

#Mysql secure installation
mysql -u root<<-EOF

UPDATE mysql.user SET Password=PASSWORD('@@{Mysql_password}@@') WHERE User='@@{Mysql_user}@@';
DELETE FROM mysql.user WHERE User='@@{Mysql_user}@@' AND Host NOT IN ('localhost', '127.0.0.1', '::1');
DELETE FROM mysql.user WHERE User='';
DELETE FROM mysql.db WHERE Db='test' OR Db='test\_%';

FLUSH PRIVILEGES;
EOF

mysql -u @@{Mysql_user}@@ -p@@{Mysql_password}@@ <<-EOF
CREATE DATABASE @@{Database_name}@@;
GRANT ALL PRIVILEGES ON homestead.* TO '@@{Database_name}@@'@'%' identified by 'secret';

FLUSH PRIVILEGES;
EOF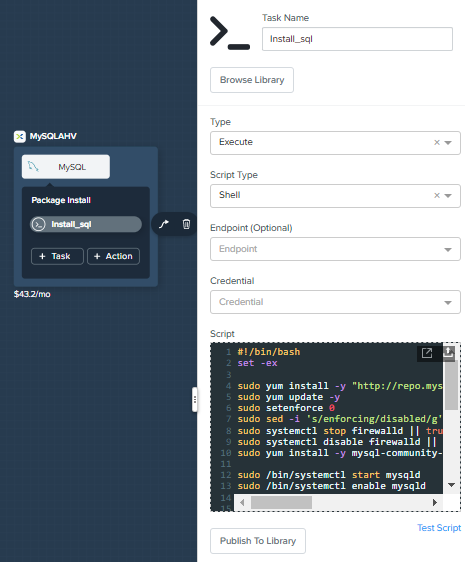
You can click the Pop Out icon on the script field for a larger window to view/edit scripts.
Select the MySQL service icon in the Workspace pane again, select the Package tab in the Configuration Panel.
Click Configure uninstall.
Select +Task, and fill out the following fields in the Configuration Panel:
- Task Name: Uninstall_sql
- Type: Execute
- Script Type: Shell
- Credential: CENTOS
- Script:
#!/bin/bash
echo "Goodbye!"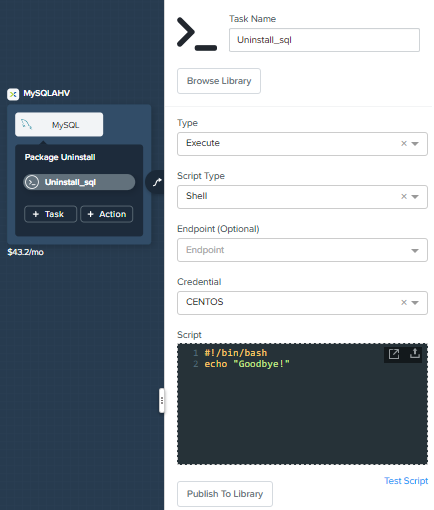 note
noteThe uninstall script can be used for removing packages, updating network services like DHCP and DNS, removing entries from Active Directory, etc. It is not being used for this simple example.
Click Save. You will be prompted with specific errors if there are validation issues such as missing fields or unacceptable characters.
Creating the Web Server
You will now follow similar steps to define a web server service.
In Application Overview > Services, add an additional service.
Select the new service and fill out the following VM fields in the Configuration Panel:
- Service Name: WebServer
- Name: WebServerAHV
- Account: NTNX_LOCAL_AZ
- Operating System: Linux
- Cluster: your_cluster
- VM Name: @@{User_initials}@@-WebServer-@@{calm_array_index}@@
- vCPUs: 2
- Cores per vCPU: 1
- Memory: 4
- Guest Customization:
- Type: Cloud-Init
#cloud-config
users:
 - name: centos
   ssh-authorized-keys:
     - @@{INSTANCE_PUBLIC_KEY}@@
   sudo: ['ALL=(ALL) NOPASSWD:ALL']
- Type: Cloud-Init
- DISKS(1):
- Image: GenericCentOS7
- NETWORK ADAPTORS (NICs)(1):
- NIC1 Primary
- Credential: CENTOS
Select the Package tab.
Specify a Package Name and click Configure install
- Package Name: WebServer_PACKAGE
Select +Task, and fill out the following fields in the Configuration Panel:
Name Task: Install_WebServer
Type: Execute
Script Type Shell
Credential: CENTOS
Script:
#!/bin/bash
set -ex

sudo yum update -y
sudo yum -y install epel-release
sudo setenforce 0
sudo sed -i 's/enforcing/disabled/g' /etc/selinux/config /etc/selinux/config
sudo systemctl stop firewalld || true
sudo systemctl disable firewalld || true
sudo rpm -Uvh https://mirror.webtatic.com/yum/el7/webtatic-release.rpm
sudo yum update -y
sudo yum install -y nginx php56w-fpm php56w-cli php56w-mcrypt php56w-mysql php56w-mbstring php56w-dom git unzip

sudo mkdir -p /var/www/laravel
echo "server {
listen 80 default_server;
listen [::]:80 default_server ipv6only=on;
root /var/www/laravel/public/;
index index.php index.html index.htm;
location / {
try_files \$uri \$uri/ /index.php?\$query_string;
}
# pass the PHP scripts to FastCGI server listening on /var/run/php5-fpm.sock
location ~ \.php$ {
try_files \$uri /index.php =404;
fastcgi_split_path_info ^(.+\.php)(/.+)\$;
fastcgi_pass 127.0.0.1:9000;
fastcgi_index index.php;
fastcgi_param SCRIPT_FILENAME \$document_root\$fastcgi_script_name;
include fastcgi_params;
}
}" | sudo tee /etc/nginx/conf.d/laravel.conf
sudo sed -i 's/80 default_server/80/g' /etc/nginx/nginx.conf
if `grep "cgi.fix_pathinfo" /etc/php.ini` ; then
sudo sed -i 's/cgi.fix_pathinfo=1/cgi.fix_pathinfo=0/' /etc/php.ini
else
sudo sed -i 's/;cgi.fix_pathinfo=1/cgi.fix_pathinfo=0/' /etc/php.ini
fi

sudo systemctl enable php-fpm
sudo systemctl enable nginx
sudo systemctl restart php-fpm
sudo systemctl restart nginx

if [ ! -e /usr/local/bin/composer ]
then
curl -sS https://getcomposer.org/installer | php
sudo mv composer.phar /usr/local/bin/composer
sudo chmod +x /usr/local/bin/composer
fi

sudo git clone https://github.com/ideadevice/quickstart-basic.git /var/www/laravel
sudo sed -i 's/DB_HOST=.*/DB_HOST=@@{MySQL.address}@@/' /var/www/laravel/.env

sudo su - -c "cd /var/www/laravel; composer install"
if [ "@@{calm_array_index}@@" == "0" ]; then
sudo su - -c "cd /var/www/laravel; php artisan migrate"
fi

sudo chown -R nginx:nginx /var/www/laravel
sudo chmod -R 777 /var/www/laravel/
sudo systemctl restart nginx
This script installs PHP and Nginx to create a web server, and then a Laravel based web application. It then configures the web application settings, including updating the DB_HOST with the MySQL IP address, accessed via the @@{MySQL.address}@@ macro.
Select the Package tab and click Configure uninstall.
Select + Task, and fill out the following fields in the Configuration Panel:
Name Task: Uninstall_WebServer
Type: Execute
Script Type Shell
Credential: CENTOS
Script:
#!/bin/bash
set -ex

sudo rm -rf /var/www/laravel
sudo yum erase -y nginx
For many applications it is common to need to scale out a given service, such as the web tier in order to handle more concurrent users. Calm makes it simple to deploy an array containing multiple copies of a given service.
With the WebServer service icon selected in the Workspace pane, scroll to the top of the Configuration Panel, and select the Service tab.
Under Deployment Config > Number of Replicas, increase the Min value from 1 to 2 and the Max value from 1 to 10.

This change will provision a minimum of 2 WebServer VMs for each deployment of the application, and allow the array to grow up to a total of 10 WebServer VMs.
noteScaling an application in and out will require additional scripting so that the application understands how to leverage the additional VMs. We will get into that with Playbooks in further exercises.
Click Save.
Creating the Load Balancer Service
To take advantage of a scale out web tier, your application needs to be able to load balance connections across multiple web server VMs. HAProxy is a free, open source TCP/HTTP load balancer used to distribute workloads across multiple servers. It can be used anywhere from small, simple deployments to large web-scale environments such as GitHub, Instagram, and Twitter.
For this step, we have two choices:
- Manually create the HAProxy service the same way as we created the MySQLAHV and WebServer services
- Use the clone service option to avoid re-entering the same information multiple times
We’ve used the manual creation method twice already, so let’s use the cloning options this time. For those that wish to do this step manually, please scroll past this section and follow the steps under Manual HAProxy Configuration.
Service cloning
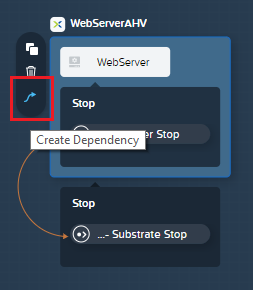
Click WebServer service and note the options that appear to the left of the icon.
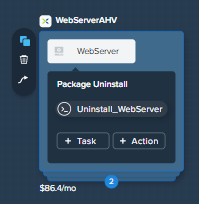
If you hover over the icon from the top to the bottom. It presents three options for the deployment:

They represents:
- Clone deployment
- Delete Deployment
- Create Dependency
For now, click Clone Deployment option and note that a copy of the service, including all options and scripts will be created. The new service name is named WebServer_cloned_0.
The cloned services inherits the properties of the original service,but it is totally independent of the origin services it inherits its services from, hence, making changes to the cloned services will not impact the original service.
Let's change the settings that needs to be different:
- Service Name: HAProxy
- Name: HAPROXYAHV
- VM Name: @@{User_initials}@@-HAProxy-@@{calm_array_index}@@
- On the Service tab, under Number of replicas: set both Min and Max to 1. Why? We cloned from the WebServer service, a service that was previously configured to allow scaling. This is a good demonstration of how identical the clone is, although the HAProxy service does not require scaling in this lab.
The cloned service has also inherited the Package Install and Package Uninstall scripts from the WebServer service. Continue to the Packages section below to configure HAProxy-specific scripts.
noteIf you have chosen to clone the services in the exercise above, you do not need to follow through the entire exercise below. You will need to fill in the fields that are required to create the HAProxy services as shown below.
Manual HAPROXY Configuration
In Application Overview > Services. add an additional service.
Select the new service and fill out the following VM fields in the Configuration Panel:
- Service Name: HAProxy
- Name: HAPROXYAHV
- Account: NTNX_LOCAL_AZ
- Operating System: Linux
- Cluster: your_cluster
- VM Name: @@{User_initials}@@-HAProxy-@@{calm_array_index}@@
- vCPUs: 2
- Cores per vCPU: 1
- Memory: 4
- Guest Customization:
- Type: Cloud-init
- Script:
#cloud-config
users:
  - name: centos
    ssh-authorized-keys:
      - @@{INSTANCE_PUBLIC_KEY}@@
    sudo: ['ALL=(ALL) NOPASSWD:ALL']
- DISKS(1):
- Image: GenericCentOS7
- NETWORK ADAPTORS (NICs)(1):
- NIC1: Primary
- Credentials: CENTOS
Packages
On the HAProxy service, select the Package tab.
Specify a Package Name and click Configure install.
noteIf you used the clone options above, a task named Install_WebServer_cloned_1 woll already exist. Alter the tasks as per below, instead of adding new tasks.
Package Name: Install_HAProxy
Select + Task (or click the existing task for cloned services), and fill out the following fields in the Configuration Panel:
Name Task: Install_HAProxy
Type: Execute
Script Type: Shell
Credential: CENTOS
Script:
#!/bin/bash
set -ex

sudo yum update -y
sudo yum install -y haproxy
sudo setenforce 0
sudo sed -i 's/enforcing/disabled/g' /etc/selinux/config /etc/selinux/config
sudo systemctl stop firewalld || true
sudo systemctl disable firewalld || true

echo "global
log 127.0.0.1 local0
log 127.0.0.1 local1 notice
maxconn 4096
quiet
user haproxy
group haproxy
defaults
log global
mode http
retries 3
timeout client 50s
timeout connect 5s
timeout server 50s
option dontlognull
option httplog
option redispatch
balance roundrobin
# Set up application listeners here.
 listen admin
 bind 127.0.0.1:22002
 mode http
 stats uri /
 frontend http
 maxconn 2000
 bind 0.0.0.0:80
 default_backend servers-http
 backend servers-http" | sudo tee /etc/haproxy/haproxy.cfg

 hosts=$(echo "@@{WebServer.address}@@" | tr "," "\n")
 port=80

 for host in $hosts
 do echo " server host-${host} ${host}:${port} weight 1 maxconn 100 check" | sudo tee -a /etc/haproxy/haproxy.cfg
 done

 sudo systemctl daemon-reload
 sudo systemctl enable haproxy
 sudo systemctl restart haproxy
Note: the use of the @@{WebServer.address}@@ macro in the script above. The macro returns a comma delimited list of all IPs of the VMs within that service. The script then uses the tr command to replace commas with carriage returns. The result is an array, $hosts, containing strings of all WebServer IP addresses. Those addresses are then each added to the HAProxy configuration file.
Select the Package tab and click Configure uninstall.
noteIf you used the clone options above, a task named Uninstall_WebServer_cloned_1 will already exist. Alter the tasks as per below, instead of adding new tasks.
Select + Task (or click the existing task for cloned services), and fill out the following fields in the Configuration Panel:
- Name Task: Uninstall_HAProxy
- Type: Execute
- Script Type: Shell
- Credential: CENTOS
- Script:
#!/bin/bash
set -ex
sudo yum -y erase haproxy
- Script:
Click Save.
Adding Dependencies
As our application will require the database to be running before the web server starts, our Blueprint requires a dependency to enforce this ordering. There are a couple of ways to do this, one of which you’ve already done without likely realizing it.
In the Application Overview > Application Profile section, expand the Default Application Profile and click the Create Action.
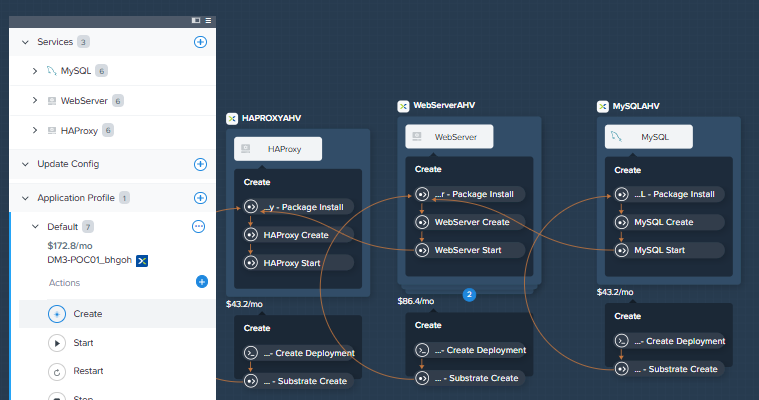
Take note of the Orange Orchestration Edge going from the MySQL Start task to the WebServer Package Install task. This edge was automatically created by Calm due to the @@{MySQL.address}@@ macro reference in the WebServer Package Install task. Since the system needs to know the IP Address of the MySQL service prior to being able to proceed with the WebServer Install task, Calm intelligently creates the orchestration edge for you. This requires the MySQL service to be started prior to moving on to the WebServer Install task.
Return to the HAProxy Package Install task. Why are orchestration edges automatically created between the WebServer and HAProxy services?
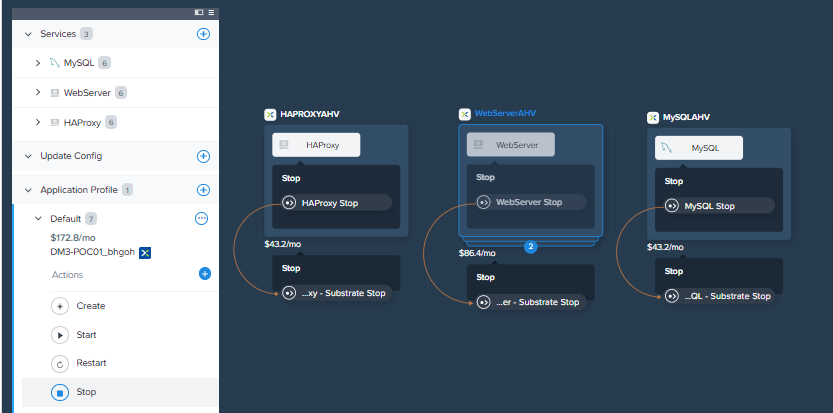
Next, select the Stop Profile Action. Note that lack of orchestration edges between services when stopping an application. Why might issuing shutdown commands to all services within the application simultaneously create an issue?
Click on each Profile Action to take note of the current presence (or lack thereof) of the orchestration edges.
 To resolve this, you will need to manually define the dependencies between the services.
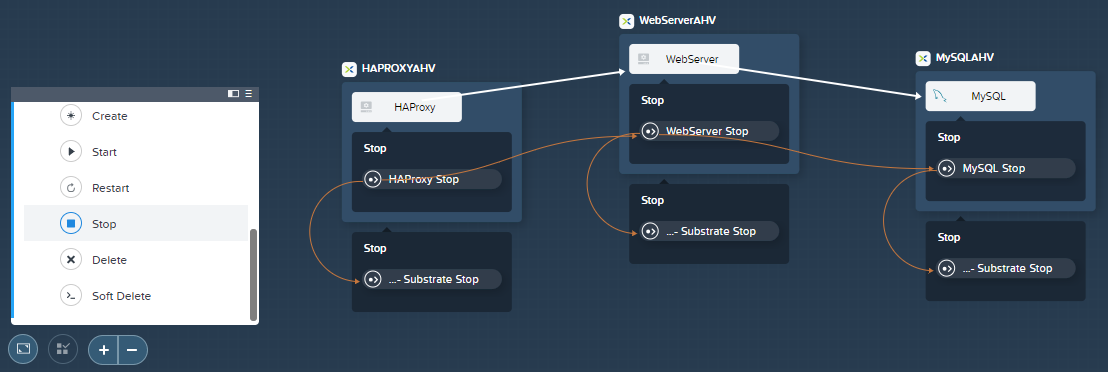
Select the WebServer Service and click the Create Dependency icon that appears above the Service icon, and then click on the MySQL service.
noteTo successfully complete the dependency creation, the MySQL label must be clicked i.e. the white box surrounding the VM name.
This represents that the WebServer service “depends” upon the MySQL service, meaning the MySQL service will start before, and stop after, the WebServer service.
Now create a dependency for the HAProxy service to depend on the WebServer service.
Click Save.
Re-visit the Profile Actions and confirm the edges now properly reflect the dependencies between the services, as shown below:
 Drawing the white dependency arrows will cause Calm to create orchestration edges for all
System Defined Profile Actions (Create, Start, Restart, Stop, Delete, and Soft Delete).
Drawing the white dependency arrows will cause Calm to create orchestration edges for all
System Defined Profile Actions (Create, Start, Restart, Stop, Delete, and Soft Delete).
Add-in Scaling Options
The scaling options build-in with Calm Blueprints enables the application owner to add in the function for the purpose of scaling in or scaling out.
In the Application Profile under App Project Accounts click the + icon.
In the blueprint designer, click on the WebServerAHV service, under Action1 click on + Task, a Scaling Task window opens on your left.
Change the Action name as ScaleOut
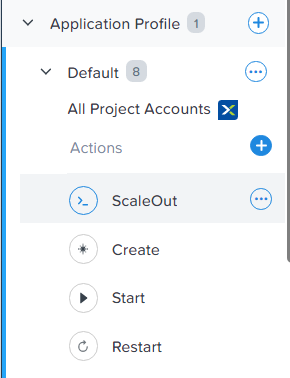
Fill in the following fields:
- Task Name: ScaleOut
- Scaling Task
- Scaling Type: scale out
- Scaling Count: 2

Click Save.
Ensure there are no errors or warnings, and when they are resolved, you are ready to launch the blueprint!
Launching and Managing the Application
At the top left of the upper toolbar in the Blueprint Editor, click Launch.
Specify a unique Application Name (e.g. Initials-CalmApps) and your User_initials Runtime variable value for VM naming.
Click Create. The Audit tab can be used to monitor the deployment of the application. Why don’t all of the CentOS based services deploy at the same time following the download of the disk image?
Once the application reaches a Running status, navigate to the Services tab and select the HAProxy service to determine the IP address of your load balancer.
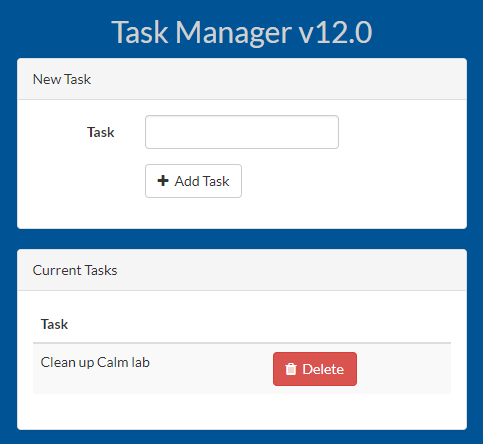
In a new browser tab or window, navigate to http://HAProxy-IP, and verify your Task Manager application is functioning.
noteYou can also click the link the Description of the Application.
Takeaways
Sally manages to create a three-tier VM Blueprint and demonstrated on the strengths and ease of use of Calm. With the Blueprint, she can now share the template across to the application team for future collaboration and development, while ensuring consistency and stability of the build.
In addition, Sally learns of the following:
Nutanix Calm, a native component of Prism, is built on and carries forward the benefits of the platform. The simplicity provided by Acropolis lets Calm focus on applications, rather than trying to mask the complexity of the underlying infrastructure management.
Calm blueprints are easy to use. In 60 minutes you went from nothing to a full infrastructure stack deployment. Because Calm uses standard tools for configuration - bash, PowerShell, Python, etc. - there’s no new language to learn and you can immediately apply skills and code you already have.
In this newly created blueprint, it can greatly reduce deployment time from days to just hours. For an organisation that Sally is in, they can see instantaneous benefits and productivity from it.
Even though this current Blueprint deploy solely on a single Cloud Provider - Nutanix. Sally can envision building multi-cloud provider blueprints in the near future, leveraging the power of Public cloud providers such as Aws, Azure and GCP.
The Blueprints Editor provides a simple UI for modeling potentially complex applications.
Blueprints are tied to SSP Projects which can be used to enforce quotas and role based access control.
Having a Blueprint install and configure binaries means no longer creating specific images for individual applications. Instead the application can be modified through changes to the Blueprint or installation script, both of which can be stored in source code repositories.
Variables allow another dimension of customizing an application without having to edit the underlying Blueprint.
There are multiple ways of authenticating to a VM (keys or passwords), which is dependent upon the source image.
Application status can be monitored in real time.
Applications typically span across multiple VMs, each responsible for different services. Calm is capable of automated and orchestrating full applications.
Dependencies between services can be easily modeled in the Blueprint Editor.
Users can quickly provision entire application stacks for production or testing for repeatable results without time lost to manual configuration.